Picket Fence Art Studio
  • Home
  • Classes
    • Adult Classes
    • Teen Classes
    • Youth Classes
  • Art Camps
    • Kids & Teens
    • Adults
  • Adult Workshops
  • Art Parties
  • About
  • Blog
  • Contact
  • Gift Card
  • Art Gallery

be inspired

Drawing a Face

3/21/2023

0 Comments

 
Picture
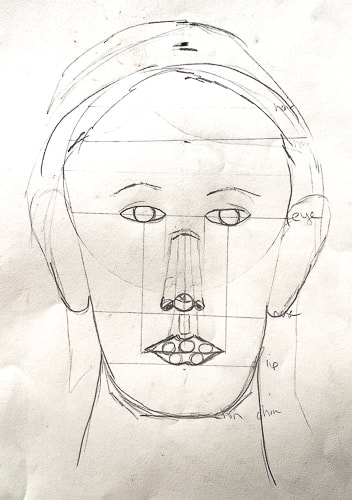
Self-portraits can be intimidating. To ease the pain, I walked the Teen class through a more technical approach to drawing a self-portrait.
 All faces have a road map; here is the one for creating an accurate portrait.
Picture
  • Drawing a Face: We used vine charcoal to keep the lines light so we could go back and tweak the shape of the edges later on.
Portrait Road Map:
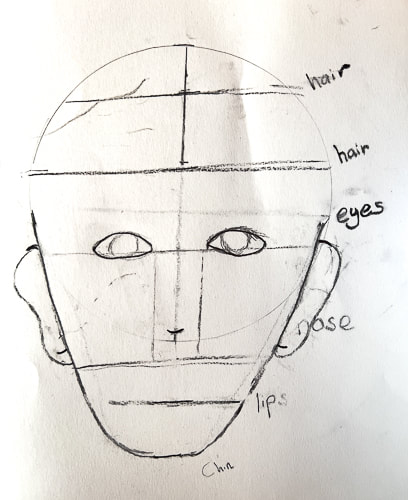
Finding the Chin Line:
  • Draw a circle/oval in the center of the page. Label the top of the circle as the crown.
  • Draw a vertical line down the center of the circle. 
  • Draw a horizontal line across the center circle. The lines don't have to be perfect.
  • Measure half the diameter of the circle with a ruler.
  • Measure the distance from the middle to the bottom of the circle and transfer this measurement to below the circle. Next, draw the chin line roughly half the length of the circle. This line will be your reference for where to draw your chin. Label as the chin.
Finding the Eye Line:
  • Erase the first horizontal line through the original circle and draw a new one at the halfway point of the current drawing. Label as Eyes.
Nose: Draw a line halfway between the eye line and the chin line. Label as the nose.
Lips: Draw another line halfway between the nose line you and the chin line. Label this as lips.
Hair: Sketch a horizontal line at the center point between the eye line and the crown. Then, draw another horizontal line between the line you just drew and the eye line. Label them as hair.
Draw the Eyes:
  • Make small, vertical dashes to split the eye line into five equal sections. Split the horizontal section into five equal parts. Use a ruler to measure the entire width of the head and divide that number by 5. You will end up with four equally spaced tick marks that divide the eye line into five equal sections.
  • Draw the left eye between the 1st and 2nd dashes and the right eye between the 3rd and 4th dashes. This will ensure your eyes are evenly spaced and identical in size.
Fill in the eyebrows directly above the eyes.
Draw the Nose:
  • Draw a vertical line from the inner corner of the left eye to the nose line. Do the same for the right eye.
  • Sketch the nose inside these boundary lines, using the vertical line in the middle as a reference to keep the nose as symmetrical as possible.
Draw the Lips:
  • Make a vertical line from the middle of each eye down to the lip line. Draw the lips in between these boundary lines, with the bottom lip resting on the lip line. 
Hair: Add the hairline in between the two separate lines labeled "hair." 
Ears: Draw your ears roughly between the eye and nose line.
Neck: Don't forget the neck.   
Erase all unnecessary lines from the portrait. Personalize.
Add value.
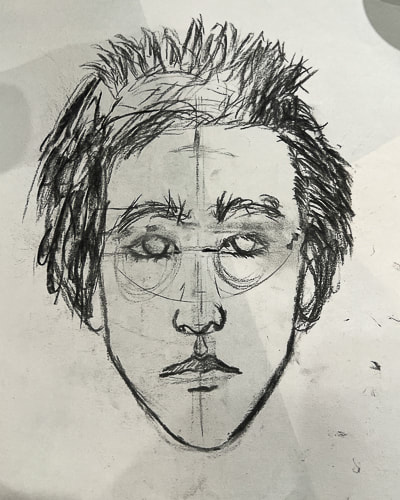
Picture
REGISTER FOR CLASES
0 Comments

Your comment will be posted after it is approved.


Leave a Reply.

    Author

    Jamie Lightfoot is an oil painter and owner of Picket Fence Art Studio.

    Archives

    April 2023
    March 2023
    February 2023
    January 2023
    December 2022
    November 2022
    October 2022

    Older Blog Post

    Categories

    All
    Acrylic Painting
    Adult Art Lessons
    Ceramics
    Charcoal Lessons
    Elementary Lessons
    Encaustic
    Glass Fusion
    Oil Painting
    Paint Parties
    Pastels
    Special Events/Workshops
    Teen Art
    Watercolor

    RSS Feed

Proudly powered by Weebly
  • Home
  • Classes
    • Adult Classes
    • Teen Classes
    • Youth Classes
  • Art Camps
    • Kids & Teens
    • Adults
  • Adult Workshops
  • Art Parties
  • About
  • Blog
  • Contact
  • Gift Card
  • Art Gallery